
Hello everyone, it is Sunday here on Tasman Island, it is chilly even though it is supposedly the warmest month. A few days ago Brent posted his movie Sailing to the Land Down Under. On request and as a follow up here are some screen shots highlighting the rig of our symmetrical spinnaker on Impi, a Lagoon 440 as well as an attempt at answering some more general questions.
This rig is different from the one used for our asymmetrical sail which you can read more about here Rig for an asymmetric sail designed for a broad reach.
A symmetrical spinnaker differs from an asymmetrical in that its construction is exactly as the word says symmetrical, which means that the sail has two exact halves.

How big is your spinnaker?
We have a 120 sqm symmetrical spinnaker, quite small for our size boat. This size was recommended by our sail makers Ullman Sails South Africa as it is less twitchy than the bigger ones and therefore more suitable for extended ocean cruising. It also has reinforced sides as to be able to deal with stronger winds. We use our spinnaker for winds up to about 20 knots.
When do you use a symmetrical spinnaker?
We use our asymmetrical sail more often than our symmetrical spinnaker as it caters for more wind angles than our symmetric spinnaker. Whereas our asymmetrical sail is for angles from 120 degrees to about 170, our symmetrical spinnaker is used only for running dead down wind or nearly dead down wind.
What do I need to fly a symmetrical spinnaker?
You need a spinnaker halyard.
You need two sheets and two control lines or guys.

You need four blocks. Two mounted at the front of the boat and two mounted aft, one on the port side and one on the starboard side.

Those are the basics, but to make things easier, we have added the following items.
A sock or spinnaker sleeve
This is a long, thin nylon sock that snuffs your spinnaker while it’s flying. By easing the load on the sail, and pulling the sock down over its shoulders, Brent normally sets and douses the spinnaker while I drive the boat.
A Tylaska fitting, or even better two
A snap shackle which enables you to safely and quickly de-power the sail.


We put one on each side of the spinnaker as to allow us to decide which side we de-power, but just one will already help a lot.

You will also need a tapered punch or fid to release the shackle.
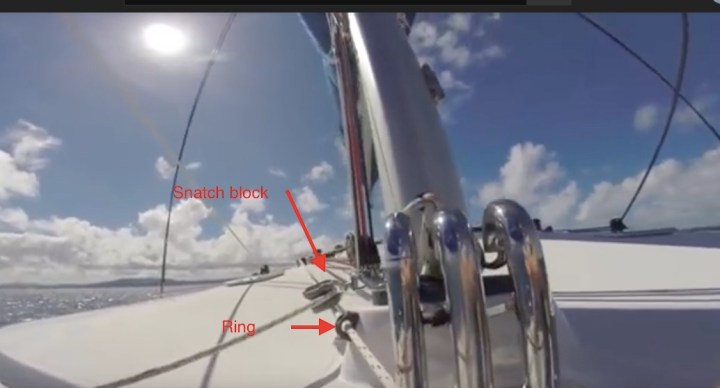
To organize the control lines back to one point we have a set up that requires a snatch block, ring, triple deck organizer and two extra jammers.

To fly this spinnaker at about 170 degrees, so where you could start flying an asymmetrical sail, we use an additional snatch block and soft shackle loop.

How do I hoist a symmetrical spinnaker?
Secure the sail in its sock near the middle of the foredeck.
Lead the control lines or guys through the front blocks. Attach the 2 Tylaska fittings, one to the tack and one to the clew of the spinnaker and tie bowlines to secure the control lines to the Tylaska. Lead the control lines back through the fittings at the bottom of the mast (snatch block and ring) then through the deck organizer, finally through jammers.
Attach the sheets to the Tylaska fitting with bowlines and lead them back to the aft blocks then to the port and starboard winch.
Attach the spinnaker halyard to the top of the sail. Make sure the halyard is outside your genoa sheets.
Have a look at all your lines and make sure they are running correctly. Imagine the sail is flying and then look at your lines. They must be for the sheets ahead of the forestay and inside of the shrouds. The control lines need to be ahead of your forestay and such that they are not obstructed by the lifelines and push pits. The halyard needs to be outside of your genoa sheets.
When you are confident that all the lines are correct, check your course is dead down wind.
Hoist the halyard. Make sure your sail is not twisted inside the sock and that the sock control lines attached to the potty run smoothly. This is easier done with one person operating the winches and another person controlling the sock and its control lines. Our sails have a red edge on the port side and a green edge on the starboard side which helps with making sure the sail is not twisted. When dousing the sail you can check this too. Keep engines running in stronger winds so that you take power off the sail.
Pre-pull the clew and tack control lines so that they are a bit off the deck. Pre-pull the clew and tack sheets so they lift a bit off the deck.
Pull the sock control lines so that the sail releases bit by bit. You can control this by putting the sock lines around a cleat which can act as a break. It means you save your hands from rope burn and your sail too will last longer with a slower release.
When the sail is fully hoisted, trim all the lines as needed..
Attach the sock control lines to the forward anchor cleat. make sure they cannot tangle on anything. make sure your potty is right at the top so it cannot tangle with anything at the top of the mast.
How do I take the symmetrical spinnaker down?
Bring the Tylaska fitting closer to the deck by adjusting the lines so that you can access it.
Release the tack or the clew by punching the Tylaska fitting.
The sail now is like a flag in the wind and totally de-powered.
Untie the sock control lines and pull the sock down, lowering the potty.
Lower the halyard and undo the lines.
Stuff the sail in its sock in its storage place.
Done, piece of cake.
