
What is a bulkhead?
A bulkhead is an upright wall in the hull of a boat. The word ‘balkr’ means partition in old Norse (Oxford Languages). Sometime in the dark and distant past sailors realized that building walls within a vessel would prevent cargo from shifting during passage. Walls were installed from side to side in a vessel’s hull and started to be called ‘bulkheads’.
What is the purpose of a bulkheads in a vessel?
Bulkheads increase the structural rigidity of a vessel and divide the vessel into cabins. They also create watertight compartments that can contain water in the case of a hull break or leak.
The Multihull Company describes a bulkhead as ‘a layer inserted into the hulls of a catamaran in order to prevent the hulls from cracking or compressing. They are added after the hulls are molded to increase stability. Regardless of the material or build quality, all hulls are subjected to the forces of water working against them.’
Are all bulkheads the same?

According to the Lagoon factory there are main structural bulkheads and non structural bulkheads.
The structural bulkheads are the mast bulkhead and the engine compartment bulkhead. They provide some rigidity to the hull. These are tabbed in.
Then there are several smaller non structural wood bulkheads which form the floor frames. These are stiffened by a composite process, a kind of resin putty is applied to fix them to the hulls.
What can one discover in surveying a LAGOON 440?
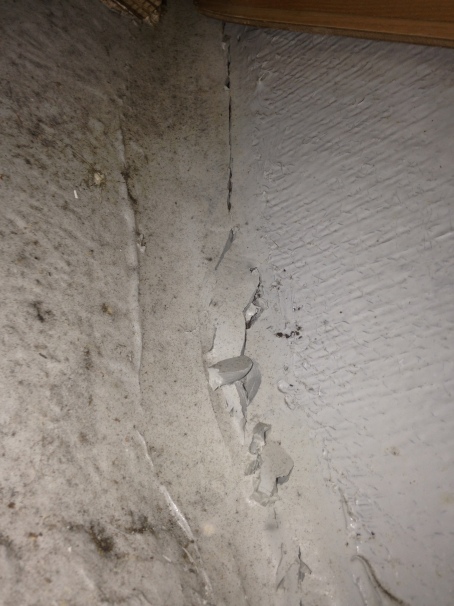
A common occurrence on a Lagoon 440 is that the non structural bulkheads get cracked.
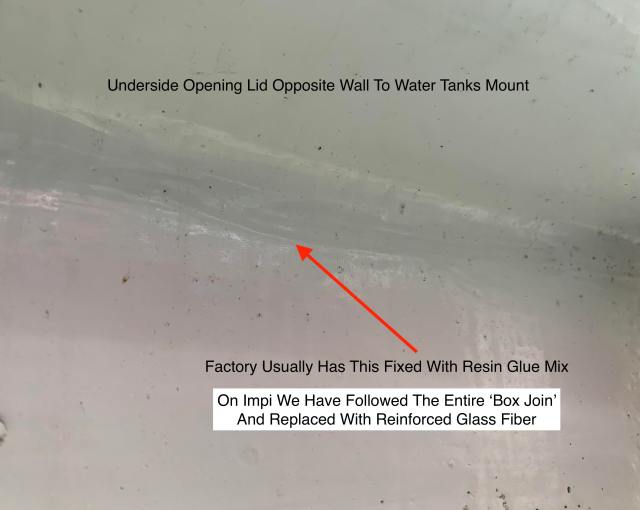
Later models such as Impi which is a late 2009 model have the entire main bulkheads from mid hull starboard to mid hull port glassed all the way around. However, some earlier models were not glassed on the top section where the deck meets the bulkhead under front windows / above the water tanks. The issue then is that the ‘mast forces’ through the mast support post can work this section loose. Therefore, it is important to remove the water tanks and glass that section in if not already done.

While one is busy doing this and with the water tanks removed, also glass the entire ‘box sectionʼ all the way around.
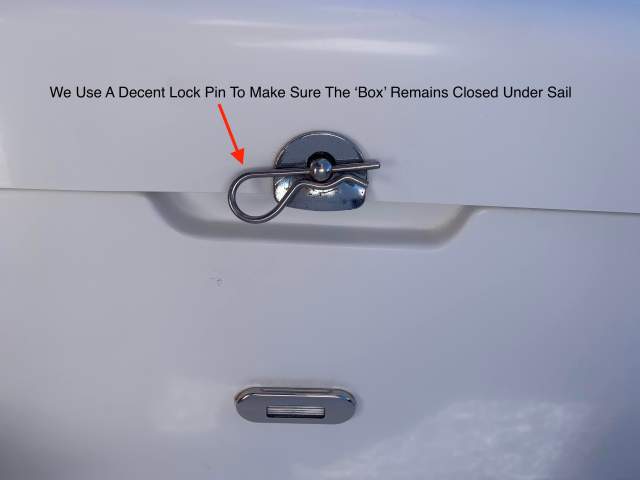
The walls of this box (port and starboard) are left open so that in the event of water gathering there it will run into the boat and to the bilge pumps. In my opinion, these areas should also be sealed up. Make sure when sailing to have a lock pin through the hatch opening ‘buttonʼ so it cannot open by accident.
That box in any rate has openings to allow water to flow into the ocean through the bottom of the box through the hull. However, it’s extremely important not to have cardboard or any other materials that could deteriorate in water and block or restrict flow through the openings. Materials such as cardboard stored in a boat that can deteriorate and break into pieces has been a cause to block bilge pumps in boats in distress and has caused loss to boats at sea as a result .One should have a false floor to cover the openings if necessary and only keep items there that will not block the vents.
Sometimes when the boat is moving in the ocean and depending on motion, sea water can back up and flow in through these vents although the boat manufacturer has installed scoops to avoid this. It can happen mostly in following seas, therefore the water that finds a way in must be able to empty quickly and efficiently back out of that compartment. This is particularly important if you are going to seal the box entirely. As mentioned, in my opinion, this should be done as it will trap air better and have less opportunity for air to expel here in the event of the boat sinking or if upturned.
To recap – the main bulkheads are glassed in from midship of one hull to midship of the opposite hull, the outer sections are fitted with a resin or resin putty type bonding material which although very strong is not strong enough to hold in severe flexing situations.
For this reason when we purchased Impi we decided to tackle the serious parts of this – let me use the worst section as an example – itʼs no secret that on a 440 and some 450ʼs the weak point is the port side bulkhead under the forward cabin section where one climbs over to get into bed.
By removing the drawer under the bed on the 440 as well as the bed wooden boards that support the mattress, one can use a phone to photograph behind this section where the join runs up the outer wall.
This will reveal if the putty is cracked and in such a case will require some surgery. Even if not cracked, in my opinion, one should grind back this putty and glass the entire section in.
Another place to look is up the wall above the bed – if it is already cracked off in this section, it is going to be a big task as it will require damaging the panel veneer which is expensive to replace, but if caught early enough you can just glass the bottom section up to underside of the bed solidly and it will support the entire board sufficiently.
To work in here is awkward but perfectly doable and may require creating some access ports. On Impi we cut an oval access point through the bed mattress support board on which the mattress rests. One can always cut it to the size of a hatch cover if you so desire and build in an access hatch there, but one can also just leave it as a ‘holeʼ with a temporary lidʼ.
How to repair a cracked bulkhead

In the picture above, the bulkhead to hull abutment is where the cable runs . There is an electrical cable lying up this section on Impi, so it is difficult to show. We have provided access to this part of the bulkhead, by removing the floors and opens access to work on the underside too. We want to glass the entire section in so that it passes the mid-hull position and ties into the existing glassed in section of the main bulkhead. Different areas will require different tasks in removing panels or boards and sometimes dismantling cupboards entirely, however, this is the main ‘telling area’ on a Lagoon 440.
The biggest task is preparation, starting with grinding out the resin putty. One needs to grind or gouge it out such that a gap passes all the way through. Leave some good sections of putty in certain places to keep all in place . By grinding and sanding we got everything back to normal fibreglass about 100 – 150mm along the ‘hull wall’ and the bulkhead. We are super careful not to grind into the hull layer more than to just clean the surface sufficiently for a proper bond.
This is the tough part to the job but it really is a part one should pay attention to because it will be the area you are bonding to and the strength of the final product is reliant on the prep work.
We went a bit over the top strengthening the outer bulkheads so that they are much stronger than the glassed sections done by the manufacturer. However, my theory was ‘why notʼ once the prep work is done, adding layers is the easy part.
We started by having a resin mix of chopped strand glass materials which I pulled off the roll in workable size pieces so it would squeeze in nicely under the bulkhead between the boat and bulkhead ‘seating areaʼ. I paid attention to have as few air bubbles as possible, grind back and reworked areas that did. I built this out sufficiently as to be able to create a curved edge between the bulkhead and hull onto which I would place ‘woven fibre glass material’.

We used a stiff paintbrush to work and compact the material in under the gap we created. We always make sure there is no air voids and work it from both sides of the bulkhead.
This process may need several applications of allowing to dry / set – grind back and reapply to avoid or grind out any air pockets.
Once completed we took a coarse sander / grinder and cleaned it up so the next layer would have a good bond.
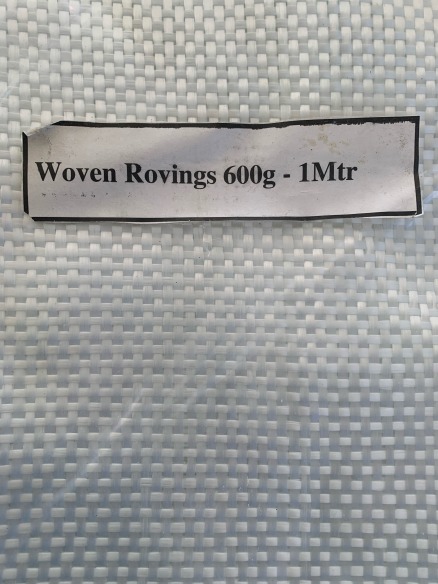
We then used woven rovings ‘patterned’ fibreglass material to place over the previous process. Again a bit OTT but applied up to 8 layers, from wider strips to narrower until it was good and strong. Woven rovings had the advantage of multi directional strength in shifting forces.
Itʼs very important to have materials that are within ‘sell by dateʼ.
At the end of the task we applied flow cote to smooth everything out and to stay in line with the principles applied by the manufacturer to our boat. Lagoon applied flow cote over all the fibreglass exposed in the hulls.
We do believe this has process has contributed to making Impi a very strong and durable cruising boat and we do believe it has prevented bulkheads shifting around and distorting furniture and joins and makes for a more solid vessel crossing oceans.
We have treated it as a ‘work in progressʼ getting to some of the other less obvious areas over time – i.e. the front water tank compartment, some of the ribs that support floorboards etc.
We believe it’s important for owners to look carefully, particularly at their main bulkheads by using cameras to follow the upper, lower, side edges where the bulkhead joins the main deck and hull of the vessel.
We believe this makes for a solid deep water cruising catamaran and will not affect the catamarans ability to still have sufficient flex on the seas.
BEFORE strengthening bulkheads itʼs important to make sure the boat is not distorted as you will now be securing it in its current position. If itʼs distorted you may want to get a professional in to realign the boat. You may have to haul the boat and chock positions to bring the bulkhead back into position. On a Lagoon 440 itʼs not that critical as the centre section of the bulkhead is solidly glassed in.
Itʼs always good to take a look at how the boat ‘sits’ – for example, do doors close and open properly?
Closing doors on any passage is good practice as it forms part of the rigidity and additional support to the bulkhead.

As always great information !!
LikeLike
Good article thank you
For reference the base of the mast can apply 20 ton load.I have seen the 440 with a bulkhead splintered from mast base all the way into the port hull.
I question the engineering of the Lagoon after seeing this failure.
LikeLike
Wow Richie, hadn’t heard that one before. For sure we have noticed that there are good teams and not so good teams who work on the boats in the factory. The management showed us how they do quality assurance in the factory but as with all production cats some issues only become visible later or due to time pressure in deliveries are not looked at.
LikeLike
While working on the bulkheads do you have to do anything to relieve the strain on the bulkheads. For instance reducing the tension in the standing rigging.
LikeLike
It is best to do this out of the water on a flat surface with relaxed shrouds. All the best Ana
LikeLike
This is a good practical article. However a few things should be noted.
1.Woven rovings should have a layer of chopped strand mat between layers and never be used woven on woven.
2. Putting a hard layer between hull and bulkhead is not recommended as this will cause the bulkhead to print through to outside of the hull as the resin cures and shrinks. Hard spots between bulkhead and hull are not desirable and could lead to stress cracking.
3 The article doesn’t mention what type of resin used. I would use at a minimum a vinyl Ester resin. Or epoxy.
40 years experience talking.
LikeLike
Thanks Myles for adding more detail, we are a bit overworked! Cheers Ana
LikeLike
How do you feel about the issues with the 450’s. Seems like it’s a class action waiting to happen. Your videos were some of the best out there bar none.✌️
LikeLike
Hi Bob, we have extensively discussed this on our page Impi@catamaranimpi (Facebook) and I have re-published this post on our website now. Have a look at our latest blog. Cheers Ana
LikeLike
As with the 450 having three ply sections in the lower portion but reduce to a single piece for the remainder of the bulkhead (a transition that appears to be the junction of where the buckling occurs) is the 440 bulkhead thicker than the 450 i.e. 3 plys thick all the way from hull to deck and not reducing?
LikeLike
On the 440 the thickness of the bulkhead is the same from top to bottom. Cheers
LikeLike
oh i see, but is it thicker or a thin single ply all the way? just seams that the 440 didn’t have these issues so i thought something changed? I was actually buying a 440 or 420 years ago and hired out a new 400 to try, i liked Lagoon its just a pity this problem has happened to the 450, i certainly hope later models after the 450 don’t succumb to similar problems, anyhow i bought a monohull lol, but i now like the new Neel 43 so could be a change yet to a multihull ;-.
LikeLike
Hi Austin, the bulkhead is about an inch thick on the 440 and made of layered fibreglass and plywood. Wishing you a happy weekend and lots of sailing fun. Kind regards Ana
LikeLike
Hello and thanks for your contribution!
I come to your links and pages often. I own a 2006 L440 and prior to purchase the owner had the fore and after main bulkheads tabbed by Horizon in the BVI. My Q is about the non-structural BH’s. I have many the are loud and want to attempt to reattached in hopes to quit the boat a bit on passages. I’ve thought about using either epoxy or 5200 where the joints have cracked. Did you/have you addressed any issues under the hull companionway stairs or under the sliding door BH. I can’t assess the stern berth BH but can under the sink starboard, this is cracked as well. Mostly annoying in rolly anchorages.
Thanks again! You are a massive help to the 440 owners!!
J-
ByeBye
LikeLike